How To Fit Your Bicycle
 |
| Professional cyclists couldn't ride the way they do without being precision fit to their bicycles. Look at how Philippe Gilbert (in front) has a slight bend in his knee at the bottom of the pedal stroke. Look at his bent elbows and relaxed upper body. Behind him, Ricardo Ricco shows off a perfect aggressive racing position with his straight flat back and super-aero stance. |
To help, we've put together these guidelines for checking and perfecting your fit. They work for on- and off-road bikes (assuming you're on the right-size bicycle and not trying to fit a too-small or large model you purchased at a yard sale, for example). Keep in mind that we specialize in bike fit. If you're experiencing a problem that you can't fix at home, come in and see us! If you think you'd like a complete analysis and fit, please contact us to set up an appointment with one of our trained bicycle-fit technicians.
Note that this article assumes you already have a bicycle. If not, we've got a store-full and would be happy to help you pick the right size one out and ensure it fits you correctly, too.

Step 1: Level and Center the Seat
Start adjusting fit by placing the bicycle on a level surface and checking that the seat is level (photo). A good way to check level is to place a carpenter's level on top of the seat. If you don't have this tool, place a yardstick on top of the seat and compare the edge of the yardstick to a horizontal sight line, which you know to be level such as a windowsill or the top of a building. While adjusting, ensure that the seat is centered on its rails over the seatpost, too.
Notes
- A level seat supports your full body weight, offers optimum pedaling efficiency and makes it easier to move around on the seat when necessary. (It's logical to think that tilting the seat down will ease pressure on sensitive areas. But, when you do this, it causes you to slide forward when riding, which puts extra pressure on your arms, hands and knees, which can lead to injury.)
- Most riders do fine with level seats. If you experience discomfort, tip the seat slightly (no more than 3 degrees) up or down. Women typically tip it down; men tip it up.
- If the seat won't move after loosening the bolt(s), the parts are probably stuck. Tapping the seat with the heel of your hand should free the parts.
- If your seat has a channel down the middle or a raised tail, don't use these as a reference. Your goal is to get the area you sit on level, not the high or low parts, but the overall sitting surface.
Step 2: Adjust Seat Height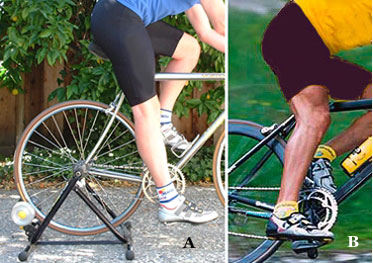
The easiest do-it-yourself seat-height adjustment is done on a trainer or indoors in a doorway and requires a friend or spouse to help. Put on your cycling shorts and shoes, mount your bike in the trainer or place your bike in the doorway, get on and hold onto the doorjamb to support yourself. Have your helper stand behind.
To find seat height, place your heels on the pedals and pedal backwards. You've found the optimum seat height when your legs are completely extended at the bottoms of the pedal strokes with your heels on the pedals (photo A).
As you pedal backwards, have your helper watch for rocking hips, the sign that the seat is too high. You want to have your legs completely extended at the bottom of the pedal stroke with no rocking of the hips. With the seat set at this height, when you're actually pedaling with the balls of your feet over the pedals, you'll have the perfect bend in your knees (photo B).
Notes
- This is a starting position. If it feels too low or high, adjust the seat up or down. But, only slightly to fine-tune the adjustment.
- When you've found the perfect position, mark it with an indelible marker (or wrap electrical tape around the post to mark it) so you won't have to go through the fitting process again. Do NOT scratch the seatpost to mark it as this can cause it to possibly break.
- Consider memorizing the measurement, too (measure from the top of the seat to the middle of the crank). This will help you set your seat height fast on a rental or borrowed bike.
Step 3: Adjust the Shoe Cleats
If you're riding in cycling shoes, it's important that the cleats on the soles are positioned correctly. There are two important adjustments, fore/aft and angular. The former is easy to find, the latter takes some careful trial and error.
Fore/aft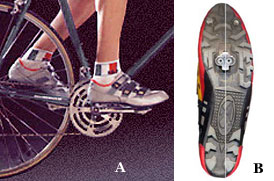
The cleat should be positioned so that the balls of your feet rest over the centers of the pedals (the axles) when you're pedaling (photo A). Sight from the top when you're on the bike to check this (hold your feet level). The balls of your feet form protrusions on the insides of the shoes and these should rest right over the axles. If not, adjust the cleats as needed.
Angular
Ideally, your cleat position allows resting your feet in a natural position on the pedals. Otherwise, you could injure your knees. Usually, aligning the cleats with an imaginary line that bisects the soles provides a safe starting position (photo B). But, go for some very easy rides to check the position and ensure it's right for your knees. If you feel any stress or strain, change the angle slightly to eliminate discomfort.
Notes
- We're experts in positioning cleats. Ask for help if you're having trouble.
- When you've found an ideal cleat position, trace lines around the cleats so you can easily replace a worn cleat and reposition a loose one.
- Use quality tools, lubricate threads and work with care so you don't strip the cleat bolts.
- Also, check your hardware to make sure it’s still tight after about 5 hours of riding.
- If you're using toe clips and straps, make sure the clips hold your feet in the optimum position (balls of the feet over the centers of the pedals). If not, get different-size clips. If you've got huge feet, place spacers between the clips and pedals to "lengthen" the clips.
 Step 4: Find Fore/Aft Seat Position
This adjustment requires a helper, too. Place your bike on a level surface next to a wall or post so you can hold yourself upright (or put it on a trainer, but be sure to level the bike). Put on your biking shorts and shoes, get on and pedal backwards until you're sitting in the "sweet spot" on the seat. Move your feet into the position shown in the photo. The forward crankarm and pedal must be level with the ground. The fore/aft seat adjustment is correct when a plumb line (any piece of string with a weight on the end) hanging from your kneecap, touches the end of the crankarm.
Notes
- As with the other adjustments, this is a safe starting position.
- If you're over 6-feet tall, ride long distances, climb a lot and pedal at about 90 rpm, you may prefer to be as much as 1 to 2 cm behind the end of the crankarm. If you're less than 6-feet tall, spin at 95 rpm or faster and like to sprint, you'll probably prefer to be directly over the end of the crankarm.
 Step 5: Check Handlebar Height
Changing handlebar height can require know-how and parts you may not have. So, we recommend using these tips only to gauge adjustment. If you discover that you need a change, we're happy to provide the parts needed and install them if you like.
The first bar-height check is comfort. If you're sore during or after rides particularly in the lower back and/or neck, the bars may need adjustment. Inspect bar height by standing your bike on a level surface and viewing it from the side comparing the height of the seat to the height of the bars (photo). For road riding, a difference of 1 to 4 inches is optimal, even slightly more, if you're a flexible racer. For off-road use and recreational riding, bar height should be equal to or up to 2 inches below the seat height. Keep in mind that these are guidelines that work for most people. Sometimes it takes a little experimentation to find the most comfortable position.
Notes
- If you'd like to measure the difference between your seat and bar height, rest a straightedge on the seat (if the seat's not level, level the straightedge) so it extends over the bars and measure the difference with a ruler.
- It's important to realize that there's a limit to how much you can raise the handlebars. The amount of adjustment depends on the frame and component design. In some cases, it may be necessary to install longer cables and housing to raise the handlebars, too.
- Tall riders (long arms and large hands) usually favor lower handlebars and short riders prefer higher ones.
- Achieve a comfortable back angle of approximately 45 degrees (depending on your degree of flexibility).
- When the bars are the right height, it should feel natural to look ahead (no neck craning).
- Another way to "raise" mountain-bike handlebars is to replace your flat bars with a riser model. These can be an inch or two higher than flat bars.
- It's usually not a good idea to raise the handlebars too much. Once they're higher than the seat, your body weight is shifted more over the rear of the bike, which can mean greater jolts from bumps in the road. This can lead to discomfort and pain.
 Step 6: Check Handlebar Reach
A proper reach to the handlebars is the key to enjoying comfortable rides. If the bars are too close or too far away, you may experience neck, shoulder, back and hand pain. And, it can cause you to scoot backward or forward on your seat all the time. On most bikes, to change length, you must replace the stem. And stems come in a variety of types and diameters. So you may want to have us check your position and suggest a proper replacement.
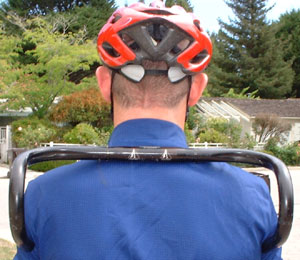
To check reach at home, put on your cycling clothes, mount your bike on a trainer and make sure the bike is level. Get on and pedal until you're comfortable with your upper body relaxed. Look ahead as if you were looking down the road. For dropped handlebars, rest your hands on the tops of the brake levers. For flat bars with bar ends, use the regular grip position. Now, have a helper look at you from the side (photo) to gauge where a plumb line dropped from the tip of your nose would fall. Optimally, there should be about an inch between the plumb line and the center of the handlebar.
Notes
- If you don't have a helper, photograph/video yourself from the side and check the picture.
- If you feel the need to scoot forward on the seat while riding, your stem is probably too long (and vice versa).
- Indicators of proper reach include: being able to always comfortably bend the elbows while riding, no hump in the back, a natural neck angle and equal pressure on the hands and seat.
 Step 7: Check Handlebar Size
Most bicycles today come with handlebars that suit the person who fits the bike. So, it's likely that your handlebars fit adequately. There are lots of different handlebar sizes and shapes, however, and changing might fine-tune your fit providing additional comfort.
Width
Check width first. For optimal control and efficiency, drop handlebars should be about the same width as your shoulders (photo). These bars come in sizes ranging from about 38- to 46-cm wide. So, if the distance between the bony protrusions on top of your shoulder blades is 42 cm, that's what the handlebar width should be.
Flat-bar widths vary, too. Usually, riders who enjoy demanding, technical trails appreciate a little additional width (24 to 27 inches), especially if they're using full suspension. All-round riders prefer a more standard width of about 22 inches. Also, if the trails you ride cut through tight spaces such as neighboring trees, you’ll want to be sure the bars aren’t too wide to clear the obstacles.
Shape
Handlebars come in various shapes, too. Flat bars have different bends and may include rise to help you sit more upright. Drop bars often feature anatomic bends in the hooks for more comfort. And they're sometimes bent differently on the tops to accommodate your wrists. Another consideration with drop bars is reach, the distance between the bar tops and bottoms. Usually, taller riders appreciate more reach.
Notes
- If your flat handlebars are too wide, you can shorten them with a tubing cutter or hacksaw. But don't overdo it. Measure carefully and be sure to leave ample room for the brake and shift levers, etc.
- Wondering how different bar shapes feel? Come on in and try some out!